
Thank you for your selection of the DRAGONWING 12' Round Pavilion. We are sure that your pavilion will weather many years of service, if you care for it properly. In this manual, you will find details on how to assemble and erect it, and how to care for it.
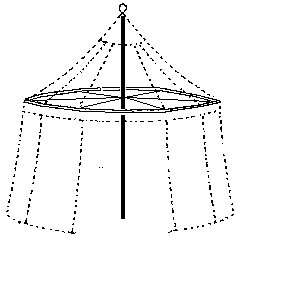
The frame provided with your DRAGONWING pavilion is a semi-rigid structure designed to keep the tent up in all but the greatest storms, with a minimum of structure and transportation problems. The result of years of continuous refinement, it can be set up by one person in much less than an hour (even in winds), is lighter and easier to transport than those of other manufacturers, and is extremely stable in winds. It consists of a center pole, a ring. made of steel tubing, to define the shape of bottom of the tent's canopy, and a system of ropes that tether the hoop to the center pole, keeping the entire structure stable in winds.
FINISHING THE CENTER POLE
We have left the finishing of the center poles to you, since it reduces your costs and it gives you the opportunity to stain or paint the pieces as you desire. Whatever your preference, it’s worth it to buy the very best finishing medium you can afford. Scrimping on the cost here is always false economy, not only because it gets unsightly a lot quicker, but also because a frame unprotected from the elements will warp and deteriorate very quickly. The friendly attendant at your neighborhood hardware store will be happy to advise you on what you need for the conditions you’ll face in your part of the world. I usually use a good marine "spar varnish" or a polyurethane varnish on the poles I use for my own tents. You may wish to go for a more "period" effect with linseed or tung oils or paint. Whatever you decide to do, do it now, right away, while the wood is still fresh and new. Remember to sand the pole first, to remove any collected grime and give the finish a good surface to stick to.
SETTING UP YOUR PAVILION
Decide where you want to pitch the tent. You want a fairly level, well drained area cleared of rocks and debris. If possible, orient the tent so that the prevailing wind will be coming from behind. That is, the doorway should be on the downwind side of the tent. This orientation will greatly enhance your comfort inside the tent.
Lay your ground cloth on the ground exactly where you want to have the tent set up.Assemble the ring, noting that half the bends have an eye bolt mounted on the tube, and the rest of the bends have a hole in them. Lay out the ring over the ground cloth, making sure that it is centered over the cloth. Orient the ring so that one of the bends with a hole in it is over where you want the door to be.

Spread out the canopy, right side up, over the ring (the apex ball should be on the outside, and the canopy plug should be on the inside. Orient the canopy so that the grommets with ropes in them are over the holes in the ring.
Remove the cinch pin from the rope pin (that thing that looks like an unthreaded eye-bolt). Put the rope pin through the hole in the ring, from the outside in, and secure the rope pin with the cinch pin. Figure 2 shows what you’re doing here.
Repeat this operation with the other five rope assemblies. Now make sure that the valence isn't fouled on the ring anywhere. You'll notice that in between every pair of holes in the ring, the shaft of the eye bolt protrudes from the ring. You'll also notice that there's a corresponding grommet on the canopy itself. That's right … the grommet goes onto the eye bolt shaft, tensioning the canopy between the rope pins. Be careful to lift the valence fabric away from the stud as you slide the grommet towards the shaft, to avoid scratching the cloth unduly. If it appears that the grommet isn't centered on the shaft, you can stretch the cloth slightly on the side toward where the grommet needs to go by putting your hand between the ring and the canopy and pulling out on the fabric.
Now sort out your tent stakes. You’ll find six long (16") stakes and a larger number of short (12") stakes. The long ones are for the tent guy ropes, and the short ones are used to stake the sidewall to the ground.
Untangle the ropes and stretch each one out from the canopy … not directly out, but off at an angle to the right and left. As you follow each rope out from the rope pin, you’ll notice that there’s a handy knot to measure with along each of the guy ropes. Take the ropes from adjacent rope pins so that they cross at their guide knots. The place on the ground underneath the place where the two knots touch is the place where one of the long stakes goes. Drive in the stake there, angling the top of the stake away from the tent as you drive it in. Loosen the slider a little and slip the loop at the end of each rope over a stake, but don’t tighten anything yet. What you’re doing should look like figure 3.

The distance from the ring that the rope knots define is a minimum dimension, by the way. If the winds are strong, make it more. (There are additional knots on the other side of the slider which may have to be loosened and retied. Their function is to keep the sliders from sliding down too far.) And for the greatest holding power, remember to drive in the stakes at a 90° angle to the rope, not the ground.
Continue around the ring, stretching out the ropes, using the guide knots to locate where the other five long stakes go. Drive the stakes in and slip the rope’s loop over the stake.
Find the center pole. If it’s in two pieces, put the pieces together. With the top of the pole in hand, crawl under the canopy and locate the plastic plug that the apex ball screws into. That plug goes into the hollow at the top of the pole. Raise the center pole to the vertical position. Don’t be afraid that the whole tent will fall over, because the guy ropes on the stakes will keep the tent stable.
If you have a wind, lift the windward edge of the canopy first, and allow the wind to help you lift the canopy after you’ve fitted the apex plug into the center pole.
Take a break; you’re more than halfway there now, and it’s time to cool off (or warm up) and hydrate. There’s no sense in making an ordeal of this, is there?
HANGING THE SIDEWALLS
You're ready to put up the sidewalls. These are made so that the stake loops should be on the bottom and facing outward. To help you distinguish inside from outside, all the top and bottom hems are folded inward. And the Dragonwing identification label on one of the sidewalls should be on the inside.
Let’s hang the left sidewall (left side as you’re facing out from the tent). (Which one is the left one? It doesn’t matter. Either one will do.) Start where you’re going to have the door. Hang the top corner of your sidewalls there, just to the right of the rope pin (that is, to your right if you’re in the pavilion, looking out) As you proceed around toward the left, you’ll notice that the hooks are slightly offset from the seams. You want to hang the sidewall so that the seams are lined up with the studs or rope pin holes on the ring. (This keeps the sidewall from wanting to shift around on the ring.) When you get to the last hook, hang it to the left of the bend.
If your sidewalls have zippers, you just start the second sidewall where the other sidewall ended. If your tent has ties, you’ll need to overlap a panel. Remember to note which side the ties are on, so you’ll hang the second sidewall so that you can tie the ties together. If you mess up, it’s no big thing; you’ll just have to re-do the overlap so that what was inside is now outside, and vice versa.
Now stake down the bottom of the sidewalls, remembering that the pavilion is designed to flare slightly outward at the base. For neatness, close the doors of the pavilion before you start staking. Each stake should be one foot further outward from where it would be if the sidewall was hanging straight down. (If you have the 16’ round, the flare-out is two feet) This feature helps keep the pavilion stable in winds, which is why it was so common on period tents.
Once the sidewall stakes are in, see if lifting up on the center pole makes the sidewalls look less wrinkled and saggy. If it does, the center pole is probably in a depression, so you’ll have to shim it up. I usually carry a few pieces of plywood three or four inches square to do this. (The shim also keeps the center pole from sinking into soft ground).
Re-adjust the tent ropes so as to minimize wrinkles in the canopy and sidewalls, and tighten them. You’ll probably have to re-adjust and tighten them periodically, particularly in changes of temperature or humidity, or in winds. To help the sliders from loosening, loop the rope under the hook provided in the slider. If it’s really windy and the ropes insist on loosening, you can wrap the rope and sliders together with string or tape.
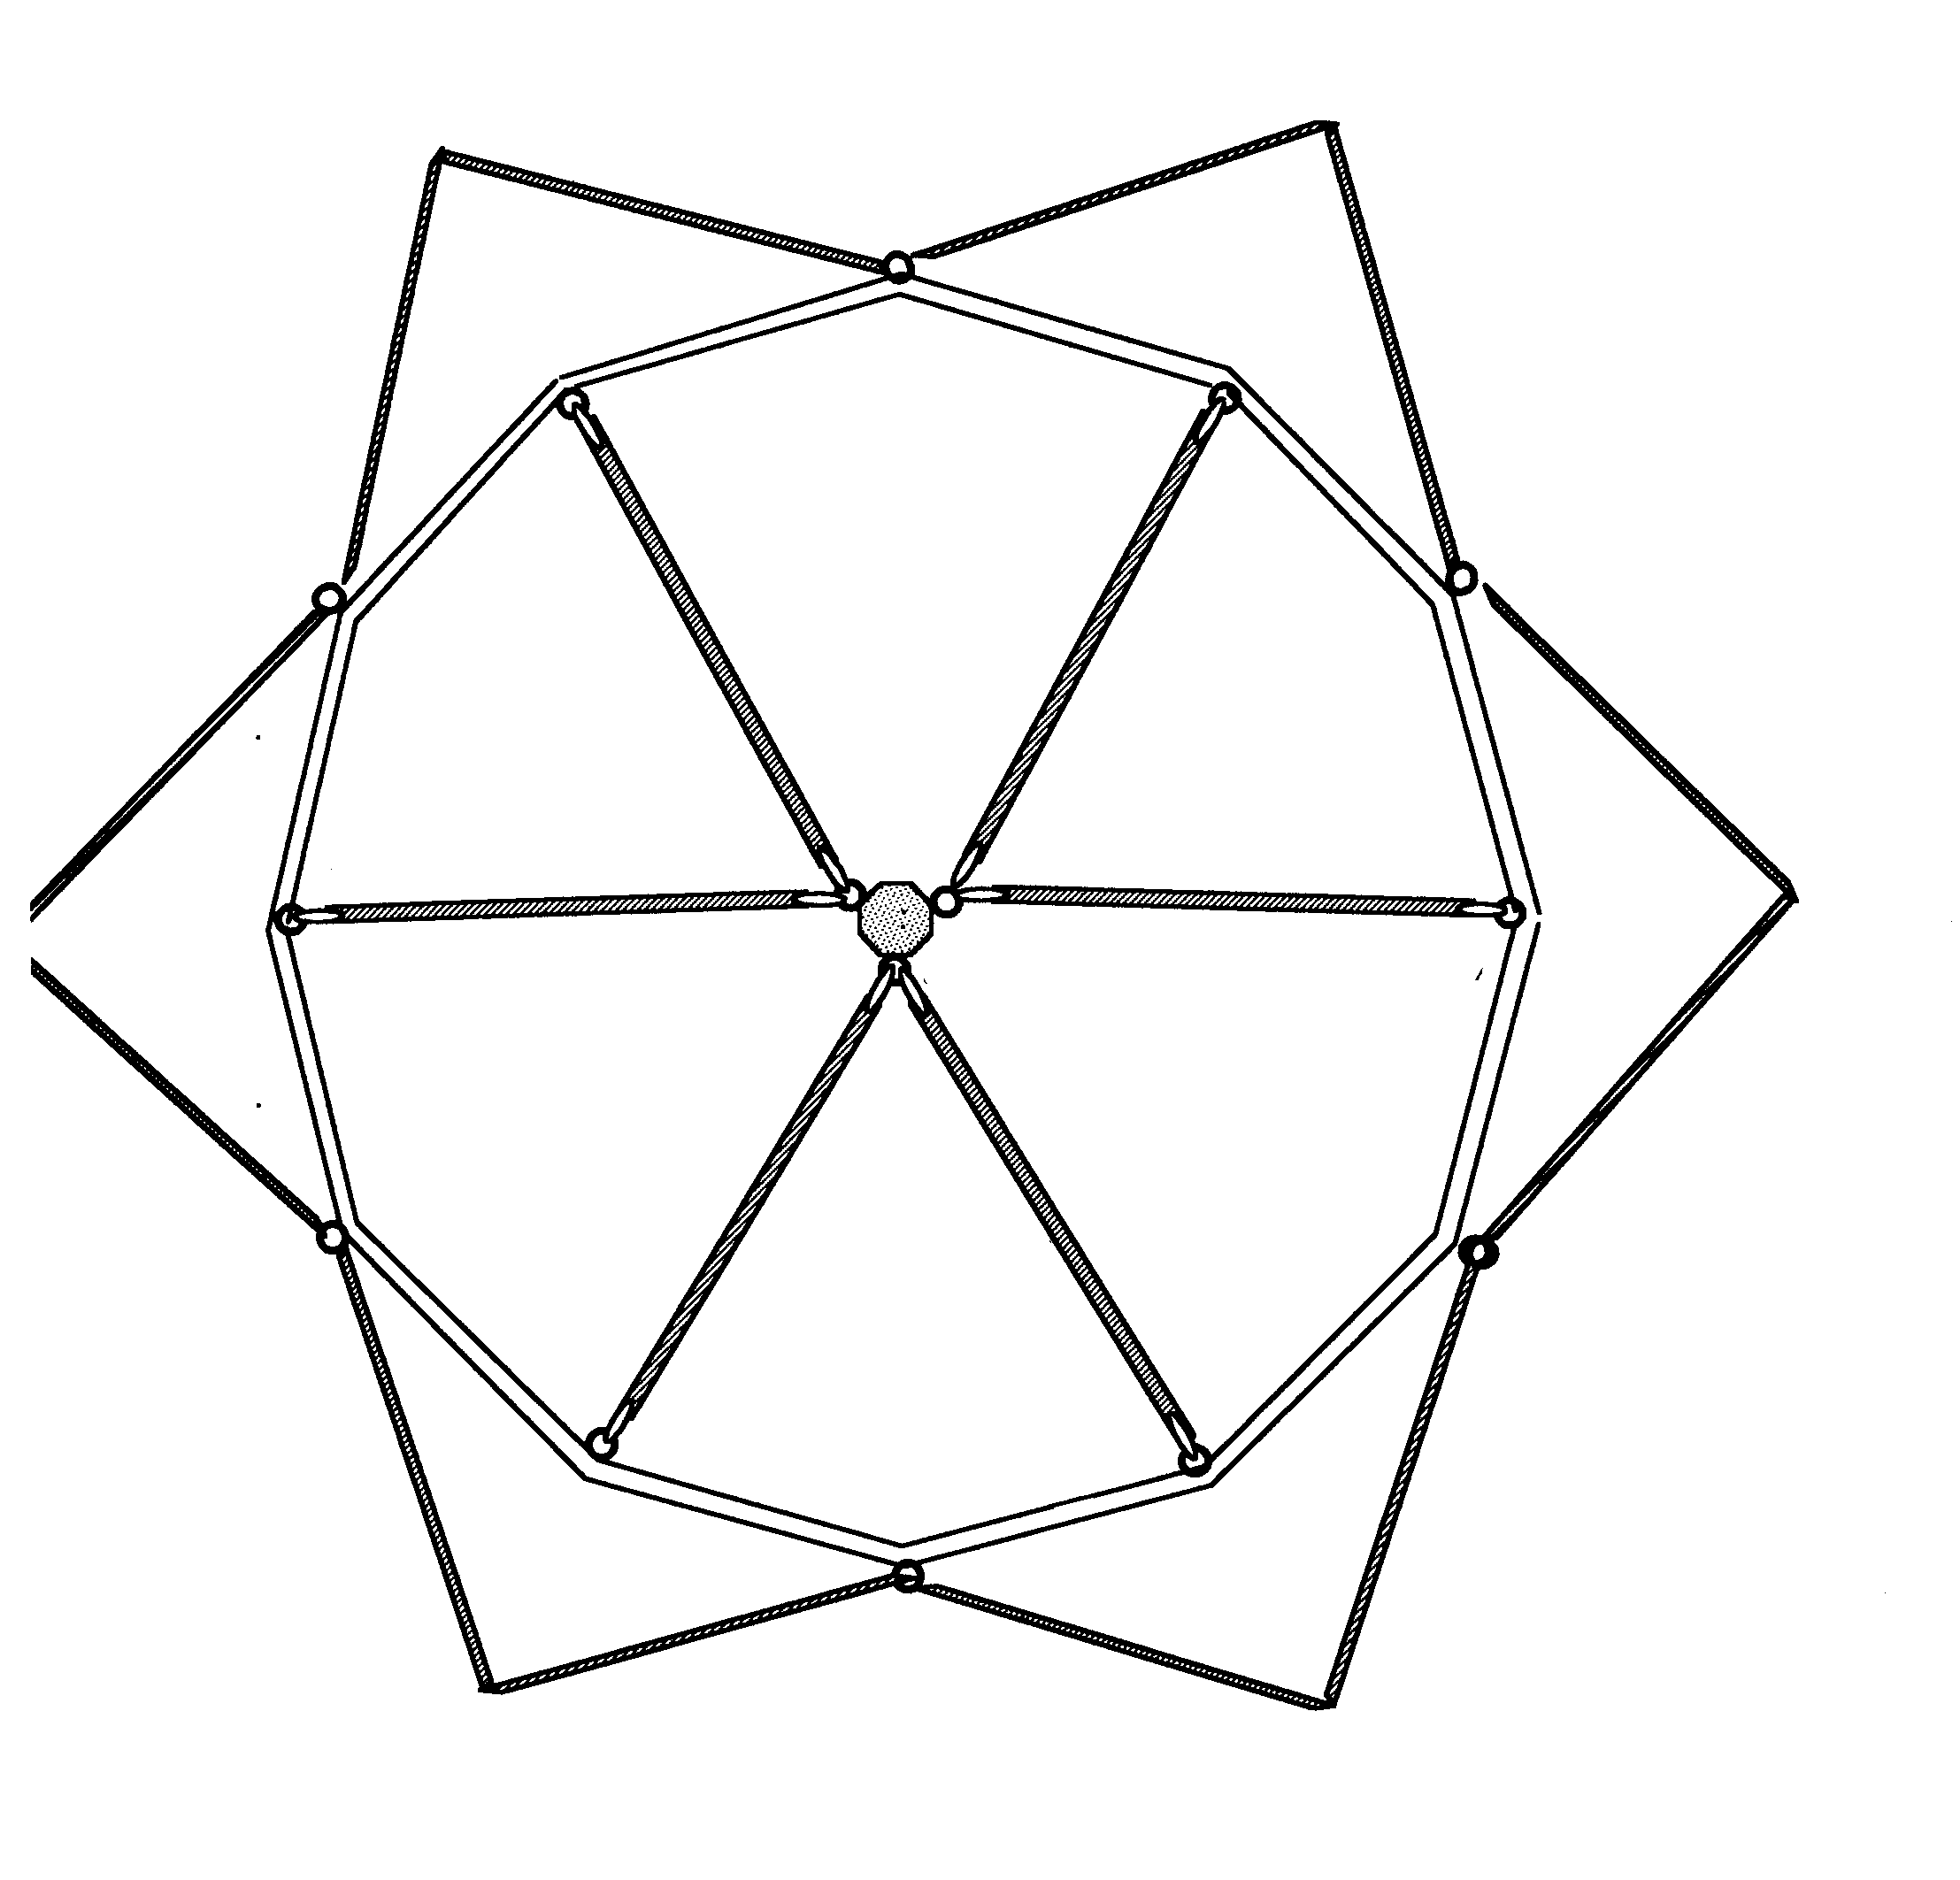
Now install the ring tethering system. Locate the spring hook installed in the center of each rope and snap it onto one of the eyescrews installed on the center pole. Then attach the snap hooks at each end of the ropes to the nearest eyebolts mounted on the inside of the ring.
Now your pavilion is set up! Have a party in it. Invite your friends.
Taking down the pavilion is the reverse of putting it up, except for these points:
When you take down the pavilion, be very careful not to harm the fabric. Be conscious of where the poke-y bits are. Before you lower the center pole, first make sure that the wind prop has been removed.
To loosen the stakes before pulling them out, rotate them a quarter-turn, then back an eighth of a turn.
To keep the guy ropes organized, keep them with the canopy. Just remove the cinch pins, take the canopy off the ring, and re-insert the cinch pins. To keep the guy ropes from tangling together, loop them into a big coil (or fold them into thirds) and tie the coil with a loose overhand knot.
HIGH-WIND CAMPING
The sixteen-inch stakes we provide for your tent ropes should suffice in all but the windiest weather, or in all but the loosest soil. But if you have an abundance of either condition, or a combination of the two, here are some things you can do to keep yourself connected to terra firma:
ODDS AND ENDS
Some SCA kingdom tourney laws require, and we wholeheartedly recommend, that you attach yellow or white flags to the guy ropes to keep your comrades from tripping on them or colliding with them in the dark.
Period pavilion floors can be made of torn-up rugs available at little cost from thrift stores. If you use a slippery plastic ground-cloth underneath them, secure the rugs well against slipping by driving long nails through the rug and ground-cloth into the ground. (If you use cheap, replaceable plastic sheeting, you won't feel so bad about it.)
If you're going to put an ornament or banner over the canopy of your pavilion, don't make it very large or heavy. Higher winds can put a lot of stress on the ornament, and your embellishment may take flight and become an airborne missile.
CARING FOR YOUR PAVILION
The first rule is: make sure that the fabric parts are free from being abraded by anything, particularly when being transported. Keep the stakes in their own canvas bag when you’re not using them.
The second rule is: don’t store the pavilion wet. Although the fabric parts aren’t particularly prone to mildew, the dirt that collect on them is, and will eventually cause discoloration and loss of water and fire-resistance. Find a dry, large area to air the pavilion if you bring it home wet, and make sure it’s dry before you put it into storage. Also, remember that the ropes are made of a natural fiber that may take longer to dry than the fabric, and which will certainly rot if given half a chance. If you must store the pavilion before the ropes are dry, take them off the canopy and dry them separately.
The third rule is: don’t clean the pavilion with anything harsher than warm water and a mild soap or detergent. My rule of thumb is that if it’s mild enough for your hands to be in (like dish soap or shampoo), it’s mild enough for the pavilion. Using anything stronger may damage the water-proofing and fire-retardant properties of the fabric. Also, be sure to rinse the fabric well. And then rinse it again. (This is because sunlight and soap combined will weaken the fabric far worse than either would by itself.)
We wish you many years of happiness in your Dragonwing pavilion. We maintain a photo album of our tents, and would be honored to include yours if you would be so kind as to send us a photograph of your tent as you have it set up for your activities. We are also keen to hear about any customizing of the design which you have performed. Again, happy tourneying!
If you have any questions or comments, or if you would like to know more about our products, feel free to call us at (916) 922-5501 or write us at Dragonwing, P. O. Box 13322,Sacramento CA 95813-3322. If we’re not in, we’ll have a voice-mail/fax machine ready to take your message.
Contents ©1990, 1997, 2003 by Dragonwing