
 |
|---|
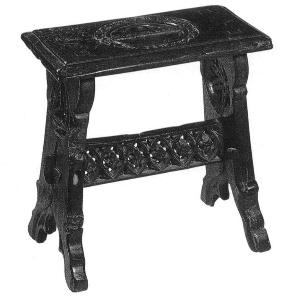
| Figure 1: The original stool |
The stool shown is a sixteenth century English design, made of oak and heavily carved. What makes this stool a bit different from others you may have seen are the slanted legs. Besides giving the stool a little more rigidity, the legs also serve to clamp the top securely to the stool, allowing it to be picked up by the top. In fact, there's a handle carved into the top for that purpose.
You make this stool from a six foot length of 1" x 10" lumber (actually 3/4" x 9-1/2" when milled for you) of your favorite flavor. The width isn't terribly critical. (Neither is the thickness, although in most cases, if you see a 3/4" dimension in the write-up and your board is a different thickness, you must substitute your board's thickness for that dimension.) You can make the stool as simple as this schematic indicates (I've deleted the pegs for clarity):
 |
|---|
| Figure 2:Schematic of a plain version of the stool |
Or you can make it more elaborate, such as this example. (I also cut holes into the legs above and below the mortise where the stool stretcher's tenons fit, but I discovered that this removes a lot of the wood necessary for the leg's strength, at least with pine. If you use hard wood, the hole would be less of a problem, but a weak point nonetheless.)
 |
|---|
| Figure 3: A decorated, carved version of the stool |
To make the stool, first saw the board into identical 18" segments. You'll be needing the full width of three of these segments, which are the seat and legs of the stool, but only a 5" width of the last one, which will be used to make the stretcher. So if you've got knots or other uglinesses in the board that you want to avoid, this is the segment to make the stretcher from.
The first thing you need to decide is what angle to make the legs. I'd recommend about 12 degrees from vertical. (The original seems to be a little less, but the greater the angle, the better the legs clamp the seat for moving). You'll want to get a bevel gauge, or cut a piece of cardboard to measure that angle, because you'll be using it a lot. Actually, the angle of your template will be 78 degrees (90 minus 12), because you'll be using the flat planes of the seat and legs as a reference. The following gauge can be printed out and glued to a piece of cardboard.
 |
|---|
| Figure 4: Angle indicator |
 |
|---|
| Figure 5: The seat of the stool |
Now to determine the width of the mortise. You can't just draw the line 3/4" from the first line, because the mortise won't be wide enough.. Find your edge marks and measure 3/4" out from that edge, and 90 degrees from the line (which, because that line is drawn at an angle, will not be parallel to the top of the seat). That mark indicates where a second "edge" line should go, and connecting these new lines at top and bottom along the width of the seat will give you the true width of your mortise.
Then use a carefully angled brace-and-bit with a 3/4" bit, or a drill with a 3/4" spade bit, to rough in the mortise holes, which are finished and squared with a 3/4" chisel.
 |
|---|
| Figure 6: The leg of the stool (2 required) |
 |
|---|
| Figure 7: The stretcher of the stool |
Lay the stretcher on your workbench and assemble the rest of the stool by putting the tenons of the leg pieces into the mortises of the seat. This is also where you check to make sure everything fits well. Now lay the stool down on the stretch, position the mortise holes of the legs directly above the tenon marks on the stretcher, and force the legs outward as much as possible. Use your third arm to trace the inside of the legs onto the stretcher (or have an assistant help you out here). Now you can cut out the tenons of the stretcher. Separate the legs from the seat of the stool, and fit the tenons of the stretcher into the legs, and re-fit the seat. It's easiest if you fit one leg into the seat, and then the other.
Temporarily secure the legs on the stretcher either by installing clamps on the stretcher tenons to keep the legs solidly against the stretcher shoulders, or by wrapping a belt around the stool to keep the legs pushed against the stretcher shoulders. At this point, the stool should stay together and be able to be lifted by its top without the stool falling apart. If this isn't the case, you may need to trim some wood from the shoulders of the stretcher.The area to trim from is indicated in gray in figure 7.
When the stool is holding together well, make lines on the tenon stretchers on the outside of the legs. This line is indicated as a broken line in figure 8, and indicates where you should measure from to determine the location of the peg hole. Now make some pegs from the scrap you saved from the stretcher. You'll need two, plus however many spares you feel comfortable carrying.
 |
|---|
| Figure 8: The pegs, and a detail of the peg hole in each tenon of the stretcher |
I'd advise cutting this hole a little short. That is, when you cut out the hole, don't go right up to the line closest to the end of the stretcher. You can always make it a little bigger if the pegs don't fit in enough for your liking, but overshooting means making new, fatter pegs.
Your last step is to take your chisel and shave off that part of the leg tenons that protrude above the seat. Finish the stool to your liking, and your project is done.
If you've made everything right, you can fold up the chair by disassembling it and laying one of the legs on the floor. Lay the seat on top of that and store the pegs in the gaps that form the hole-and-handle in the seat. Put the other leg on top of that and the stretcher at the top of the pile, and tie it all together snugly to keep the pegs trapped within the seat.