
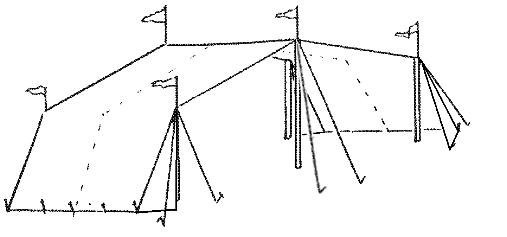
Here at Dragonwing, we've always encouraged people to make their own tents rather than buying from us, Aside from shooting ourselves in the economic foot, this practice helps justify our existence in the Greater Scheme of Things and (we hope) gives us Karmic brownie points somewhere down the line. This month, we continue this tradition by showing how to make a type of sunshade seen in SCA encampments over much of the American West, and increasingly in other places as well. It's very stable in winds, easy to set up, and reasonably rain-resistant as well. The original was designed by Fred Hollander (known in the SCA as Duke Frederick of Holland or simply "Flieg"), but subsequent research suggests that he had essentially re-invented what was a sixteenth or seventeenth century design. His first one was much longer and lower than the present design; when someone remarked that it looked like a Klingon battle cruiser, it acquired its present nickname of the "BC."
The frame consists of four poles 7' long and, depending on whether you're making a two-panel or three panel sunshade) two or three longer poles. You'll also need six guy rope assemblies and enough stakes to nail everything down. Details on how to make these components can be found in the latest version of the Dragonwing Sunshade Owner's Manual.
I'm going to give you specifications for a 10' x 20' sunshade, the kind I most often make. Flieg's are usually larger (typically 15' x 30'), because his encampments are larger, and you can adjust the dimensions to suit you. By adding a center panel (which necessitates one more center pole), a 15' x 20' sunshade can be built with the same instructions, but you're going to need four more patches for stake loop reinforcements and additional reinforcement for the third center pole.
The material I use is a 60" cotton-polyester twill about six or seven ounces in weight (per square yard, but you knew that). I've used pure cotton and pure polyester as well, but found that these fabrics don't perform as well. The pure cotton is very stretchy and will distort much more over time than the cotton-poly blend. Some cotton content is important, though, since the cotton swells when damp, making the fabric less porous. The material isn't waterproof, and a hard rain will mist through it and there will inevitably be some seepage in rainy weather. But if the sunshade is properly pitched, most of the water will run down the inside of the fabric to the ground without dripping on the stuff underneath.
A truly waterproof material has an additional disadvantage of not letting any air pass through its fabric. The result of this lack of porosity is a much more effective wind-catching effect. This is why sailmakers have forsaken natural cloth for tightly-woven polyester and other synthetic stuff, which they then treat heavily with resin or plastic to make it as impervious to air passage as they humanly can. They want more wind-catching efficiency in their products, but you don't. You want material that vents loads, not passes them along to the frame.
Stay away from nylon altogether. Although a nylon sunshade packs up small and is very strong and water-proof, it's so transparent to ultraviolet rays that it's quite possible to get a sunburn while underneath it.
I do not recommend going over about eight ounces for your cloth. The additional weight really does nothing except add more weight to the poles and to the crap we have to carry around. One of the advantages of this design is its light weight and minimum structure for the area it covers, and it would be a real shame to nullify these traits by using a heavy cloth. It also makes the cover much more difficult to sew.
If you've got some 48" wide cloth that will fit the bill, you can use three panels of that width instead of two panels of the 60" wide stuff, Four panels of 48" wide stuff will take the place of three panels of the 60" wide stuff.
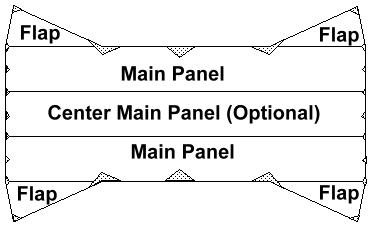
This design also includes flaps (also called "elephant ears") to regulate wind and draft and help minimize the "wind tunnel" effect you get by having so much cloth open at the front and back and staked down at the sides. While these aren't strictly needed, at least on the smaller models, they add to the practicality of the design.
For a two-panel sunshade using 60" wide cloth, you'll need about 23 yards of fabric for the main body and patches, plus 5-1/2 yards for the flaps. For a three-panel sunshade, add another 10-1/2 yards.
For a three-panel sunshade using 48" cloth, you'll need about 33-1/2 yards for the main body and patches, plus 7 yards for the flaps. For a four-panel sunshade, add another 10-1/2 yards.
If you're wise, you'll order a little extra (like 10% more) to compensate for any errors that your cloth vendor might have made when measuring the cloth for sale.
Cut the main panels first, to be sure you have enough continuous cloth off the roll to form each panel. There are two ways to cut them. The first way, if you have a lot of space to cut and pin them up, is to cut each panel to a length of 364" (30' 4"). Maybe you work in an office building that has long hallways, where they won't mind you coming in after hours. (A friend of mine used to work at AT&T and used their hallways late at night to lay out sails.)
But if you're like me, with a cutting area that is only 24 feet long (or less), listen to Secret Trick #1: instead of cutting out one long panel, cut out two short ones. To be precise, they are each 15' 2", plus 12" for a seam allowance, for a total length of 16' 2" (or 194"). This has three benefits for me:
1. I can fit the panels on my cutting table with space all around.
2. With half panels, I can sew each half of the sunshade separately, and join them at the ridge at the last step. I'd rather assemble and sew two shorter seams than one long seam. Your experience may differ, but that's what mine has taught me.
3. You can use shorter pieces of fabric. Sometimes it's hard to get a good continuous thirty feet out of bargain cloth, what with thread flaws, splices, and so on, so shorter panels give you more latitude to cut around the bad stuff. Stuff too short for the main panels can be used for the flaps, patches, and other uses.
But doesn't that neccessitate another seam along the ridge? Well, yes, but the top of the sunshade gets a lot of tension, so it has to be reinforced anyway, either with a strip of webbing, or a pocket with a rope in it, or with extra layers of the cloth itself. With the two-halves method, the ridge seam itself acts as the reinforcement. (I suppose you could call that benefit number four.)
Since I sew the ridge seam to be eight inches wide, each panel needs to be one foot longer to provide material for the seam allowance.
If you elect to use a single panel 30' 4" long, you might consider cutting it 20" longer so you can reinforce the apex with a "false seam" ten inches wide, to provide the same reinforcement against stretch. That way, you won't have to sew webbing onto the ridge.

Using this panel as a template, cut out three more panels just like it, marking point "B" on each one, but don't draw the other lines.
Cut out your reinforcements with the remaining material. You'll need six patches that are 20" square, which you'll be folding artfully to form the pole grommet reinforcements, plus four patches 10" x 20" for the bottom corners of the flaps, plus enough patches to reinforce where the stake loop grommets will be going. These last patches are 10" square. For a two-panel sunshade, you'll need ten patches; for a three panel, make fourteen patches; and for a four-panel, eighteen patches.
If you're using flaps in your design, you'll also need four pieces of material, 2" wide and 40" long, cut directly along either the warp or the fill of the cloth.
Now to begin sewing. I usually sew the flaps to the main panels first. To do this, I make a mark 96" from the end of the panel along the selvage. Now I lay the flap onto the main panel, lining mark "B" on the flap with the mark I just made on the main panel and the bottom of the flap. I use the cut edge of the flap, not the selvage edge, when I'm forming this seam. You have to be careful not to put any tension on the flap at this seam, since, being cut somewhat on the bias, it will be more than happy to stretch beyond the 96" allotted to it. (There's a reason why we're not using the other long edge of the flap, where the selvage is, and I'll tell you the reason by and by.)
Sew the pieces together with a flat-fell seam. (See last month's column if you don't know what that is. In fact, it would be wise to review the whole column, just so you understand the theory behind some of these patches and seams.)
Once the flaps are on, you sew the main panels together. I use the same flat-fell seam, although I suppose you wouldn't need to if you were using the full width of the cloth, and if the cloth has a true selvage (which doesn't fray). But I think the flat-fell seam adds a little strength as well.
Those of you who are using the single long panels will have to add the ridge reinforcement -- webbing, rope-in-pocket, false seam, whatever -- once all the panels have been sewn into one piece. Those who use the half-panel method will make a flat-fell seam, eight inches wide. (I find it easiest to form the seam entirely with pins and, with all folds in place, secure the seam with four stitch lines, removing the pins as I go. I guess that would make the seam something other than a true flat-fell, in which you first run one stitch line, then fold, and lastly run the other stitch line.)
Those with wider sunshades (three-panel for the 60"-cloth people or four-panel for the 48"-cloth people) will want to put another reinforcement directly on the ridge ridge reinforcement, at the midpoint of the sunshade. This for the third center pole that wider sunshades require. I usually use a square of 2" seat-belt webbing for this reinforcement, but you can use more cloth, or leather, or something else.
Now trace a hem line all around the sunshade, two inches in from the edge of the cloth. You'll be folding the edge to this line, then folding again at the line itself, to form a hem one inch wide with the edges of the cloth inside.
To make the patches, take the square of material and fold it point-to-point, forming a triangle. Fold it once again to form a smaller triangle. The cuts in the material should now be along the base of the triangle. The base of the triangle should be positioned on the hem line you just drew in the last stap, so they go inside the hem of the sunshade, where they won't fray. The six larger triangles are to reinforce the area around the poles. The four for the side poles will go right at the top of the flap panel (96" from the end of the panel, remember); you'll have to trim them a little so they go around the angle formed by the main panel and the flap. The remaining two large patches go at each end of the ridge, where the center poles will go through the cloth.
The smaller patches are formed the same way, and are positioned at each seam in the main body of the sunshade, and also in the middle of each panel. Therefore, they should be 24" or 30" apart (depending on the width of the cloth you're using. The patches that go where the main body and a flap are seamed together will need to be trimmed to suit the slight angle formed there.
The 10"x20" patches for the flap corners are folded once, to form a 10"x10" square, and again to form a triangle. In this case, the shorter sides of the triangle are positioned at the hem line, leaving only the longest edge exposed when the hem is formed. Again, you'll have to do some trimming. Since this point is a high-stress area, I also put a piece of light webbing there, usually hiding it underneath the patch.
Before hemming up the sunshade, there's one more Secret Trick I'll share with you. The bottom of the flap is cut on the bias, and would stretch abnormally if we didn't do something about it. This is what the extra 40" strips of material are for. You cut these to 2" wide and oriented them so that either the warp threads or the weft (or fill) threads go all the way along them. These strips won't stretch very much. Sailmakers call this sort of reinforcement "tabling" and add it to a cloth border to give it more resistence to stretch (as opposed to a bias tape, which protects the edge from fraying but does absolutely nothing to control stretch). Pin or baste the strips to the bottom of the flap panel, so they will be sewn into the hem itself. With these two strips sewn into the hem, the hem won't stretch. In fact, you've now controlled stretch along each edge of the flap with the reinforcement sewn into the bottom hem, one of the long sides sewn into the main body, and the remaining long side oriented so it runs along the warp of the cloth itself.
Now you can sew the hem around the sunshade. I also add a square of that 2" seat-belt webbing at each point where one of the frame poles goes through the fabric, on top of the patches already there. Is this overkill? Yeah, probably, but since I warrant my sunshades for five years, the extra reinforcement greatly adds to my peace of mind. Most of the home-sewn sunshades omit this last reinforcement, and most of them do just fine.
The last step is to install grommets. I use fairly large ones (#3 spur) where the poles go through the fabric, because this allows me to use a 3/8" rod at the end of the pole, and also because large grommets do a better job of spreading load than smaller grommets do. At the stake loops, I use #1 spur grommets, because I make my stake loops out of 3/16" rope and this size works best with that rope thickness. I have used plain grommets here, but they didn't hold up very well.
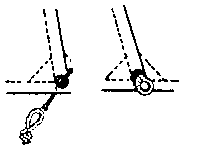 to make your stake loops, cut a piece of #6 (3/16") polyester rope to a length of 16", and the ends together with a simple knot. Pass the loop you just formed throught the grommet, and voila!. Since I drew the picture on the right, I've developed another step to the process: I tie the loop into another knot on the opposite side of the grommet from the first knot, to keep the loop from falling out.
The latest Dragonwing sunshades use steel rings instead of rope stake loops. These are attached to the sunshade with segments of webbing. I recommend this method, especially if you're using stakes made from square stock.