
Many people like to paint their tents, because it's often the easiest way to put their device (or some other elaborate graphic) on their tents. Others want to recreate the type of "architectural" painting one sees on depictions of period tents.
In fact, most of the painting of period tents followed seam lines, suggesting that one purpose of the paint was to help seal the seams against leakage. As is noted below, the effect was also to stress the "verticality" of the tent, drawing the eye skyward as the lines of Gothic architecture do. The addition of "architectural" details -- arches, columns, and the like -- may have been seen as a natural outgrowth of this earlier, necessary use of paint. However it happened, architectural details form the bulk of the painting details we see on depictions of period tents, and re-creators find them a distinctive way to make their tents unique and period-looking.
If you want to paint your tent, the very first thing you must do is obtain some more of the same type of material that your tent is made of. Each type of fabric is unique in its ability to hold paint, and it behooves you to experiment on scrap pieces before you apply paint to your tent. Tent manufacturers are usually happy to provide you with scrap, which they generally have in abundance. So don't hesitate to take advantage of this opportunity.
Tents made of "Sunforger" or other all-cotton canvases can take just about any kind of paint. The only danger here is that they tend to absorb a lot of paint. That's a good thing, because it allows the paint to soak directly into the fibers of the cloth and results in a long-lasting application. But its downside is that if you're not careful, it can absorb more of the paint than you want, and all the colors come out a bit darker or more intense than you'd like.
Most tents which use a cotton-polyester blend with an acrylic top coat (and these consist mainly of Dragonwing tents, although there have been other manufacturers who have used it in the past) take well to artist's acrylic paints. The paints are easy to apply, flexible, and reasonably durable. They come in two varieties. The first type is a "high-viscosity" formulation that mimics the consistency of oil paints. This type works well for those who are brushing directly on the canvas, but can't be airbrushed on, because you'd have to dilute it too much go get the airbrush to accept it.
A better match for top-coated fabric is the second variety of acrylic paint, known as a "medium viscosity" paint. This uses more pigment and less thickeners, which is what you want when you're painting on canvas. Even thinned to the point where an airbrush can use it, it does a pretty good job of covering the fabric. It's important to use a thinning medium specifically designed for air-brush use. Even thinned down, this paint is still a bit thicker than the stuff that usually goes through an air-brush, so make sure your compressor and nozzle arrangement is up to the job. If you're silk-screening a fabric with an acrylic top coat, you could really go with either a "high-viscosity" or a "medium-viscosity" medium, although you might get better results with a high-viscosity formulation, since it seems to behave more like silk-screen ink. It's wise to buy a little of each type of paint, and see which one works better with your fabric, your screen, and your technique.
If you're using stencils, the higher-viscosity paint may work better because it resists "wicking" under the stencil.
Whatever your canvas, there are many ways to apply pigment. What follows is, in no particular order, observations that people have passed on to me on what methods and tricks worked best for them.
If you're using a stencil and air-brushing the paint on, it helps to have some way of sticking the stencil material to the canvas. Otherwise, the blast of air might force the stencil off the canvas, causing particles of paint to blow underneath the stencil. I've used two methods for doing this. The first method uses double-sided tape around the edge. This stuff can be hard to come by, and tends to be expensive, but is available.. The other method involves punching lost of holes around the periphery of the stencil and covering the holes with tape. When you lay the stencil on the canvas and rub on the tape, the stencil will adhere to the cloth.
A lady who uses stencils reports that she's had good luck with the sort of printer's ink that lithographers use. Here are some things to stay away from (or at least experiment with a lot before you commit yourself to putting much work on a real tent):
1. Felt-pen ink dispensers like "Magic Markers," "Sharpies," "Marks-a-Lot" or other trademarked names. These tints aren't very color-stable. They fade or change hue dramatically with exposure. They tend to bleed, too.
2. Commercial house-paint ... even the so-called "acrylic enamel" paint. It's for houses, not fabric. Some people have written to tell me that they've used it with good results. Others have written to tell me that it's all flaked off after a few years (or even months).
If you have a small but intricate design, in color, that you'd like to have on your tent but don't want to paint on, there's another alternative. If you have access to a scanner and a color ink-jet printer, it's possible to make iron-on decals in whatever design you can scan in. We at Dragonwing have been using this method to print the "Warning" labels mandated by California law, and can make an iron-on for you for a nominal fee. The only trick with applying these is to use just enough heat. Not enough heat will make the decal fail to adhere to the cloth, and too much will cook the ink and cause the colors to change a bit. (Of course, if you stick with a black-and-white design, you won't have that problem, and you can use a cheaper non-color ink-jet printer.
In closing, I'm reprinting here a short article on tent-painting by Andrew Tye, known in the SCA as Master Ivar Hakonarson. It originally appeared on an SCA mailing list as part of a thread on painting tents. I haven't personally used Versatex paint, but I've seen the results on his pavilion and it is impressive when used with Sunforger. I plan to experiment with it on other cloths (including top-coated fabric) and will let you know how it works.
Andrew writes:
"The fabric paint I recommend is called Versatex Printing Paint. It comes in about 40 different colours, (including metallics), and is available in sizes up to one gallon. In this quantity it is MUCH cheaper than the 2-6 oz. bottles one buys at craft stores. (A gallon is not too much to think about. I used the better part of a gallon of blue on my French bell.) Also, I believe that it is superior to the craft store fabric paints in that it gets into the weave of the fabric and is not prone to chipping, cracking, or peeling. It also holds up very well. I painted my pavilion 7 years ago and it is still bright and crisp. Also, the painted wall hangings that the Barony of Adiantum has are painted with Versatex and are even older.
"There is a web site for Versatex through the Dharma Trading Company. It lists colours, prices and quantities.. Its URL is: http://www.dharmatrading.com/vt.html
"A final word about Versatex. I have used it on several different types of fabric. Silk, cotton/poly bedsheets, bleached linen, and Sunforger-treated cotton canvas. (Anti-flame, anti-mildew treatment). It works on all of them. Heat set is with an iron for small things and in a triple-load commercial dryer for the pavilion.
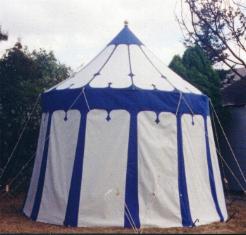
"The second point I would like to make about painting pavilions is to look at period exaples in manuscripts. In almost all of them, the verticality of them is emphasised by the painting or applicaying over of the seams. A modern architect would call this "celebrating the structure." Most professionaly made pavilions, (Tentsmiths, Tentmasters, more recent Panthers), are vertically seam engineered. This means the seams do all the work of carrying the tension loads from the top to the ground. By calling this out by painting the seams, you give the tent the perception of having more height and give it a sense of order and rythymn.
"The next thing one might notice in the decoration of period pavilions is that there is a sense of horizontal order as well. In this I mean that there is a bottom, a middle, and a top. The bottom decoration, or base, visually connects the tent to the ground and provides it with a sense of solidity. (I have also used it on my tent to help disguise the mud and dirt that the bottom edge attracts.) The middle portion is usually determined by human height and is most commonly seen as the valance and dagging. This helps provide a sense of human scale. The top, or capital, decoration visually connects the tent to the sky. In this, it tends to be fairly light and airy. Also, the vertical seams all converge at the top. In order to lighten this, the capital decoration often extends beyond the fabric of the tent in the form of finials, cresting, and banners & pennons.
"The most common style of pavilion decoration found in manuscripts is what is called Gothic Tracery. This is a form of embellishment that is derived from the architecture of the late 12th through the 15th Centuries. Similar to the architecture, this style emphasises the vertical with slender columns, curved elements, and pointed arches. It is also sometimes called "organic" as the forms seem to curve and grow like a tree. For a pavillion, this tracery would infill the top and bottom edges of the fabric panels. Art historians sometimes refer to this artistic style as "International Gothic" as it spread all over Europe from Ireland to Romania and from Spain to Estonia. It is found in buildings, furniture, artwork, and in everyday accessories. If one has a pavilion designed after those of this time and place, this style would be the most appropriate.
"Finally, I would like to add one caveat to all budding pavilion painters: 'Think not so much as an artist painting a canvas but rather as a painter painting the trim of a house.' "